Showing posts with label veggies. Show all posts

Healthy Chili Rellenos

>> Thursday, April 15, 2010

I really like chili rellenos, but they are so unhealthy. Chili rellenos consist of Anaheim or Poblano peppers that have been broiled so that the skins can be removed and stuffed with either cheese, meat or a combination of both. But it doesn't stop there. After the chilis have been stuffed, they are battered and fried! Holy calorie overload! I decided to try my hand at a more healthy version. I scoured the Interwebz, but couldn't come up with anything. So, I put my mind to work. These are a combination of my Stuffed Bell Peppers and tacos (sort of). Oh and beware, these babies are nice and spicy! If you don't like heat, leave out the cayenne. And if you want to cut down on the fat even more, leave out the cheese or use reduced fat. Here's what I came up with:

Steph's Healthy Chili Rellenos

6 Poblano or Anaheim peppers
1 yellow onion, diced
2 large cloves of garlic (or up to 4 small ones), minced
1 lb 97% or more fat free ground turkey
2 teaspoons cumin
1 teaspoon chili powder
1/4 teaspoon cayenne
1 teaspoon black pepper
1/2 teaspoon sea salt
2 jalapenos, seeded and diced
2 Roma tomatoes, seeded and diced
1 can black beans, rinsed (I use Sun Vista salt-free)
Jalapeno-Jack cheese (I didn't measure, but I grated a 1in x 2in x 1.5in piece of Organic Valley, roughly 1 to 1 1/2 Tbsp per chili)

Preheat oven to 350 degrees.

Fill a large pot with water and put on the stove to heat up. Cut a "T" into each pepper carefully. Try to remove the ribs and seeds from each pepper. I had to shake mine into the sink to remove more seeds. Put the peppers into the pot of water. When the peppers are softened, take out of the water using a tongs and lay on a towel to dry.

Meanwhile, heat a pan with 1 to 2 tablespoons of olive oil. Add garlic and onions and cook for a few minutes. Add in the turkey and cook until browned. Put in all spices and the jalapenos and cook for a few more minutes. Finally, add in the tomatoes and beans and cook until thoroughly mixed and heated through.

Mist a glass cooking dish (or two in my case) with non-stick cooking spray. Carefully lay the peppers in the pan(s) and fill them with the meat mixture. Sprinkle a little cheese inside each pepper and bake for 15-20 minutes.

By the time I had added the spices to the pan, Jason had already come into the kitchen to tell me that it smelled really good. Then, I let him sneak a piece of turkey and he LOVED it. Here's the chilis right before I put them in the oven:


 And here's one on my plate served with brown rice and sliced avocado:

Read more...

Oh happy, happy foodgasm!

>> Tuesday, January 19, 2010

Oh my gosh. I had the BEST dinner tonight. Jason has been spending a lot of time at his parents' house working on his project truck which leaves me on my own for dinner. I got tired of cereal and sandwiches so I decided to try out Bobbi's recipe for Whole Wheat Honey Pizza Dough. You can find the recipe here.

I realized after starting the dough that I don't own a pizza pan. Who doesn't own a freaking pizza pan? Me, that's who. I decided to put it on a cookie sheet instead and make the best of it. My dough still turned out in a round shape, but next time I think I'll roll the dough out thinner. Here's what I put on top:

  • Central Market Organics True Texas BBQ Sauce
  • Sliced bell pepper
  • Sliced red onion
  • 1 boneless, skinless chicken breast that I had already baked
  • Sliced tomato
  • Roasted red peppers
  • Baby spinach
And here's what my handiwork produced:


Not too bad for my first time making dough! To compliment my pizza, I made the most awesome salad that ever existed. Seriously. I had two helpings! My salad ingredients were:
  • Central Market Organics herb garden spring mix
  • Sliced Cucumber
  • Sliced avocado
  • Calamata olives, chopped
  • Artichoke hearts
  • Feta cheese
  • Central Market Organics Vinaigrette de Provence - holy moly this stuff was good! I don't even like dressing but this one was so, so good!


Doesn't that look so good? If my tummy could smile, it'd be grinning right now. Me. Love. Food.

Read more...

Winter Vegetable & Fish Soup

>> Friday, November 20, 2009

With the weather suddenly turning cooler, I had a craving for soup. This soup was really, really easy to make and it tasted yummy. I actually doubled the recipe below, so that's why the pot looks extra full!

Here's the leeks in low-sodium chicken broth.


Adding in the broccoli.....

Adding in the zucchini (these were leftover from our summer garden):

Adding the fish......

Adding in the spinach and spices....

And we're done! Enjoy!

Winter Vegetable & Fish Soup
~serves 2 generous bowls, 221 calories, 8g fat, 1 g saturated fat, 0 trans fat, 48mg cholesterol, 646 mg sodium, 10 total carbohydrates, 1 g dietary fiber, 3 g sugar, 28 g protein, 3 mg iron.

  • 1 tbsp olive oil
  • 2 leeks, chopped
  • 2 14-0z cans low-sodium chicken broth
  • 1 cup fresh/frozen broccoli, chopped
  • 1 small zucchini, diced
  • 8 oz frozen halibut fillets, cut into bite-sized pieces (you can use any whitefish; I used orange roughy)
  • 1 cup baby spinach
  • 1/8 tsp ground black pepper
  • 1 tsp dried oregano
1. Heat oil over medium heat in a large saucepan; add leek and saute for 2 minutes. Stir in broth and bring to a boil.
2. Add broccoli and zucchini and simmer for 3 minutes.
3. Add fish and simmer until it turns opaque, approximately 3 more minutes.
4. Add spinach and seasonings and simmer for 2 more minutes. Serve. Enjoy!

Read more...

Pesto!

>> Wednesday, September 16, 2009

I've never made homemade pesto before, so it was high time I tried it out! It was so, so yummy! When I asked Jason if he liked it, he said "YES!!!" When I asked him if I should make it again, he replied "Oh hell yes!!!"

I think he liked it.

Disclaimer: Although your mouth make thank you, your thighs probably won't. Sorry. My suggestion would be to eat another helping of pesto pasta to shut them up.


Pesto Sauce
2 cups fresh basil
2 Tbsp pine nuts or walnuts (I used walnuts because that's what I had on hand)
1 Tsp salt
1 Cup extra virgin olive oil
1 clove garlic
1/2 Cup grated parmesan cheese
1/2 Tsp black pepper

Remove basil leaves from stems. Place 1 cup basil leaves, pine nuts/walnuts, salt, olive oil, garlic and pepper in a blender. Process until well mixed. Add remaining basil leaves and parmesan cheese and blend well until the mixture is a smooth puree.

And that's it!

I delicately dumped the basil-y goodness over some swirly pasta and topped it with slices of baked chicken breast and a little extra parmesan cheese. It was delightful!

You could also use it as a marinade for chicken before grilling. You can also refrigerate or freeze it if you think you could wait to eat it. Enjoy!

Read more...

Greek Bulgur Salad With Chicken

>> Tuesday, July 21, 2009

This turned out to be such a yummy summer recipe, found online at Cooking Light. It makes a TON and can be used as a stand-alone dish or as a side dish. I think it's even better the next day after all the flavors had melded together. If you've never tried bulgur (and I hadn't), it's kind of like a larger-grained couscous.


Greek Bulgur Salad With Chicken

*makes 10 servings at 1 2/3 cup a piece

Ingredients
4 1/2 cups water
3 cups uncooked bulgur
3/4 fresh lemon juice (about 3 lemons), divided
2 teaspoons salt, divided
2 1/2 cups chopped skinless, boneless rotisserie chicken (I used 2 baked chicken breasts)
2 1/2 cups chopped, peeled cucumber
2 cups halved grape tomatoes
1 cup chopped fresh parsley
1/2 cup thinly sliced fresh basil
1/2 cup finely chopped red onion
1/2 cup (2 oz) crumbled feta cheese (or as much as you darn well please!)
1/4 cup extravirgin olive oil
1/2 teaspoon black pepper
10 kalamata olives, pitted and chopped (or as much as you darn well please!)

Preparation
Combine water, bulgar, 1/2 cup lemon juice and 1 teaspoon salt in saucepan and bring to a boil over medium high heat. Cover, reduce heat and simmer 5 minutes. Remove from heat and let stand for 15 minutes or until all the liquid is absorbed. Uncover and cool to room temperature.

Combine remaining 1/4 juice, remaining 1 teaspoon salt, and remaining ingredients in a large bowl. Toss to combine. Add cooled bulgur mixture; toss well to combine. Cover and chill.

Read more...

Green Monster: Redo

>> Wednesday, June 10, 2009

Remember the green monster I tried? It wasn't too bad, but I decided to change things up to see if I could make it work as a post-workout drink. This time, I blended:

  • 1/2 cup unsweetened Almond Breeze
  • 1/2 frozen banana
  • 1 scoop milk chocolate protein powder
  • 1 cup spinach leaves
And that's it. I didn't add ice, because I didn't want it to be too much of a smoothie. I like to drink my protein a little quicker and this was the perfect consistency for me. It was more chocolatey than anything. I enjoyed this one and will definitely be making it again!

Read more...

Lunch & a Green Monster!

>> Sunday, May 31, 2009

I decided to put on my creative kitchen hat and make myself a healthy lunch. Something that I might not usually eat. This is what I came up with:

It's a bowl of spinach with water-packed salmon, artichoke hearts (love these!), kalamata olives, feta cheese and walnuts. Nope, no dressing. I've really don't care for many dressings, so when I'm at home I just skip them. This salad was pretty good, but it was definitely missing something. (And no, not dressing!) I think I needed one more ingredient to finish it off but I just can't figure it out. Either way, it was still a fairly filling salad and I'm inclined to make it again.

And I just have to mention that it's in my favorite dish. My grandmother had this set and everytime I use it, it reminds me of all the Christmas Eve dinners we had at her house. Those dishes always make me smile.

Moving on.

I've been reading Angela's blog for some time now. She has a great outlook on fitness, health and life in general. Although she's a vegetarian and I'm most definitely not, I still really enjoy reading about her recipes. One of her daily staples is a green monster.

Now, I'm not going to lie here. The first time I saw that glass full of green weirdness, I wanted to close my computer screen. It caused me to revert back to my childhood where I shirked away from anything that was green. I could hardly believe that someone was choosing to drink something so.......GREEN! But slowly, as I kept reading her blog, the green monster intrigued me. And it didn't seem quite so horrible as the days went by. And then I think it challenged me. Yes, I could hear the green monster taunting me, teasing me for being such a foodie wimp.

So I bit the bullet and I made one.

And it wasn't so bad. In fact, dare I say it........was a little tasty. It had a smoothie texture and a fruity flavor. I mostly tasted the banana and not really the spinach at all. I probably should've blended mine a little more, but I got too excited about the whole experience.

And I'm a little impatient.

But I think I will definitely make this again! It will be a great after workout shake by simply adding some protein powder to the mix. But I guess you want to know what's in the mix anyway. Here goes:

  • 1 cup spinach leaves
  • 1 cup Almond Breeze (original)
  • 1 Tbsp ground flaxseed
  • 1 ripe banana
  • 1/2 cup blueberries (pretty much all I had left
I think that next time I'll use a frozen banana to give it even more of a smoothie feel. Overall, I liked it!

And that is how it came to pass that Stephanie defeated the Green Monster.

Read more...

Moroccan Couscous with Seven Vegetables

>> Friday, May 1, 2009

This might be my favorite recipe yet. It turned out so, so yummy! It's not very spicy at all and spells delicious. The downside? It takes a long time to make. It would be a great Sunday thing to make and then eat throughout the week.

Sauteing the Ras El Hanout, garlic & olive oil:

Adding in the first few veggies and water:

Putting the pureed veggies back into the dish:

I have no idea why the picture is sideways because it's correct on my computer! ???

Finally, enjoying the final product with some cilantro on top:

And the breakdown:

Ingredients:

  • 3 tsp olive oil
  • 3 cloves garlic, minced
  • 1 Tbsp Ras El Hanout (see below)
  • 1 large sweet potato, peeled and diced into 1-inch pieces
  • 2 small turnips, peeled and diced into 1-inch pieces
  • 1 medium zucchini, diced into 1-inch pieces
  • 2 carrots (10 oz), peeled and cut into 1-inch pieces
  • 1/4 head cabbage (about 1/2 lb), cut into 1-inch pieces
  • 1/2 red bell pepper, cut into chunks (I used the whole thing)
  • 1/2 cup green beans (about 2 oz), cut into thirds (didn't use because I was out)
  • 1/2 to 1 tsp Harissa or any chile paste or hot sauce (I used 1 tsp Cholula)
  • 1/2 tsp sea salt
  • 1/4 cup raisins, soaked in 2 or 3 Tbsp warm water for 10 minutes, drained
  • 3/4 cup canned chickpeas, drained and rinsed
  • 16 oz white fish (tilapia, haddock or sole), cut into chunks (I used Tilapia)
  • 1 1/3 cup whole-wheat couscous
  • 1/2 cup fresh cilantro, chopped, divided
Instructions:
  1. Heat oil in large stockpot over medium heat, add garlic and Ras El Hanout. Quickly stir until brown, about 1 minute. Then add next 5 ingredients. Pour in enough water to cover vegetables. Cover and cook for 25 to 30 minutes, until vegetables are soft but not fully cooked. Add pepper, beans, Harissa and salt. Cook for another 10 to 15 minutes, until tender.
  2. Ladle out 3 cups of broth and vegetables (1 1/2 cups each). Puree in blender until thick. Add back to stew.
  3. Mix in raisins and chickpeas. Bring to a simmer over medium heat and place fish on top of mixture (don't mix in, or fish will break up). Cook, covered, for 10 to 15 minutes or until fish flakes easily with fork. Fish will steam on top.
  4. While fish is cooking, boil 1 1/3 cups water in a saucepan over high heat. Take off heat, add couscous and cover. Set aside for 5 minutes. Fluff with fork. To serve, place 1/2 cup couscous in bowl. Pour 1 cup vegetable-fish mixture over top and sprinkle with 1 Tbsp cilantro.
Steps 1 & 2 can be completed up to 2 days in advance. Keep mixture in an airtight container in the refrigerator until you're ready to continue.

Ras El Hanout (Makes 2 Tbsp)
  • 1 1/2 tsp cinnamon
  • 1 tsp ginger
  • 1 tsp turmeric (careful! this stuff stains!!)
  • 1/2 tsp ground black pepper
  • 1/2 tsp allspice
  • 1 1/2 tsp ground cumin
  • 1/2 tsp ground coriander
Mix all ingredients in a small bowl until well blended. Seal in an airtight container and store in a dark, dry spot in the pantry; it will keep for up to a year.

Read more...

Zucchini Lasagna

>> Tuesday, March 24, 2009


I adapted this recipe from one I found in Clean Eating magazine. It's still clean, but I like my way better! This is an odd recipe that uses zucchini strips instead of noodles.

Preheat your oven to 350 degrees and grease about a 9-inch square pan. As you can see, my pan is very full, so I would recommend putting it onto a cookie sheet before baking. You could also just use a larger pan which is probably a little bit smarter. But I like a challenge. Your ingredient list is as follows:

  • 1 yellow onion
  • 3 garlic cloves
  • 1lb lean ground meat
  • 1 jar (about 16 oz) low-sodium, low-fat tomato sauce
  • 3 zucchini squash
  • 1 egg
  • 1 Tbsp whole wheat flour
  • 1 large container of fat-free/low-fat cottage cheese
  • 1/2 cup fat-free/low-fat grated mozzarella cheese
Chop the onion and mince the garlic. Saute this in a pan with your choice lean meat (I used turkey). Cook until the onion is softened and the meat is almost completely cooked through. Add in the tomato sauce. I used a marinara sauce and thought it was a little boring, so I added some Italian herbs, a little salt & some black pepper. But you can do whatever you want. I usually go by my mother's mantra: "If some is good, more is better!" Let the mixture simmer for about 10 minutes.

Meanwhile, wash the zucchini squash and cut them into 1/4 inch strips. This part is important. If you cut them too wide, then they won't get cooked all the way and they will taste a little raw. And I don't like raw veggies that much. Once you've cut the zucchini, grab a bowl. Stir together the egg, whole wheat flour, the fat-free/low-fat cottage cheese and about a 1/4 cup of fat-free, low-fat mozzarella cheese in the bowl.

By this time, the meat mixture should be about done. Put a layer of zucchini on the bottom, follow it with about 1/2 the meat sauce and 1/2 the cheese in the bowl. Repeat the steps until you make your final layer of zucchini on top.

Bake for 30 minutes, then add the other 1/4 cup of mozzarella cheese on top and bake for another 10 minutes. After taking it out of the oven, let is sit for about 10 more minutes to set.

Enjoy that cheesy, meaty, messy goodness on your plate! Yum!

This might be kind of interesting to use eggplant instead of the zucchini. Or instead of the meat, use more veggies as filler. There's many, many possibilities!

Read more...

Garlicky Hummus

>> Tuesday, March 10, 2009

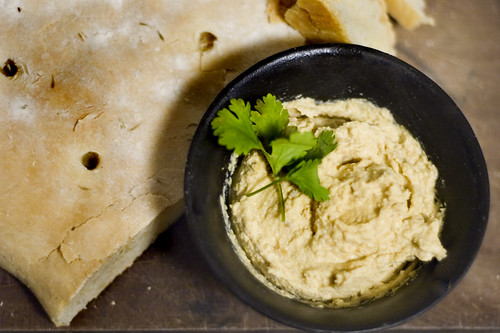
I decided to finally try to make some homemade hummus. It was super easy! Just throw 1 can of rinsed garbanzo beans (chickpeas), 1 Tsp Sea Salt, 1/3 cup Tahini, 4 garlic cloves, 1 Tbsp olive oil and the juice of 2 lemons into a blender. You can make it as chunky or as smooth as you like. Mine came out pretty garlicky, so I may cut that down to just 2 cloves next time. But to be fair, I think I used gargantuan garlic cloves. I couldn't make mine pretty enough to photograph, so you'll get to enjoy this picture instead. :)

In case you're wondering where you find Tahini, it's next to the peanut butter.

Read more...

Stuffed Peppers

>> Tuesday, February 24, 2009

Remember when I said I must be growing up because I found out that I actually LIKED cottage cheese? Well, I also found out recently that I like bell peppers....and all colors at that! I decided to try out a stuffed pepper recipe. I don't have the exact recipe with me, so I'll have to fudge it a little, but you'll get the gist.

You need at least 4 peppers (whatever color you like). Cut the tops off and remove the seed and inner core of each. In a large pot, boil water, then add the peppers. Keep them in there for a few minutes so they get a little soft. Then, remove them and put them upside-down on a paper towel to drain.

Meanwhile, you'll need two cups of cooked brown rice. I used easy-peasy Uncle Ben's microwave rice, but you can do it the long way, too. Put the rice in a bowl to cool. Saute 1 chopped onion and 1 or 2 grated carrots in some olive oil and cover for 10 minutes. The original recipe is vegetarian and I really wanted some protein, so I added 1lb of turkey to the onions and carrot mix. Add 3 garlic cloves pushed through a garlic press and cook a while longer. Then, add 2 cups of chopped tomatoes & 1 can of rinsed black beans and cook for about 5 minutes. The recipe also called for corn, but I didn't have any, so I skipped it.

Remove the mixture from heat and add to the rice in the bowl. Squeeze the juice of one lime and add salt and black pepper. The recipe also called for cilantro, but since my husband hates it, I didn't put it in. :(

Mix thoroughly and put the stuffing in the peppers in a greased pan. I had a lot of stuffing left over, so I shoved it in-between the peppers. Next time, I may do 6 or 7 peppers. Bake for 20 minutes in a 350 degree oven. Enjoy!

Read more...

Tomato & Roasted Garlic Soup

>> Tuesday, January 6, 2009

Since the cooler weather blew in, I've been wanting to make some soup. I finally got up the courage (and time!) to try out this tomato soup recipe I've been eyeing.

Here's the setup:


First, you have to roast the garlic. I highly recommend doing this part on a day that no one will be coming over. I had to profusely apologize to our AT&T repairman today because the house reeked of garlic. Since this takes 40 minutes in a 400-degree oven, you could also just do it the day before to save time. Mmmmm......garlic.

After the garlic cools, you have to squeeze out the garlic cloves. This was a pretty messy affair for me. My fingers were a mess and I had to pick excess paper out of the garlic paste. Just an FYI. Maybe you'll do better than me.

To start the soup, I sauteed onions & celery in a little olive oil.

After the onions & celery were softened, I poured in stewed tomatoes (I used no salt added; took 5 cans), water and all of the spices.

Once this boiled, I let it simmer for 30 minutes. Now the fun part comes. The recipe says to puree the mixture with a hand blender. I don't have one of those, so I had to pour in the soup, bit by bit, into my blender. You can see what a mess I've already made from all the pouring.

At some point here, I've forgotten to close the pantry door. Cassius got a wild hair and decided to explore. (This is a first, by the way) Obviously, he's feeling MUCH better.

So after pureeing, this is what the yummy soup looks like with a little jalapeno jack cheese:

One mistake I made was using no salt added stewed tomatoes. The soup needed a little salt afterward, so keep that in mind. And now, here's the actual recipe:

Tomato & Roasted Garlic Soup
Ingredients:
1 head garlic
1 tsp extra virgin olive oil (I used more....)
Salt & Pepper
1 cup chopped onion
1 cup chopped celery
8 cups stewed tomatoes, including juice
1 bay leaf
2 tsp dried oregano
2 tsp dried basil
1 cup water
1 tsp dried thyme

Directions:
~Preheat oven to 400 degrees. Remove loose, papery skins from garlic, leaving head intact. Cut half an inch off the top of the garlic. Drizzle with olive oil and sprinkle with salt & pepper. Bake on center rack for 40 minutes until garlic has softened. Place on plate to cool. Once garlic has cooled, squeeze roasted garlic into a small bowl. The paste will be added to the soup.
~In large saucepan or Dutch oven, heat 1/2 teaspoon olive oil. Add onion and celery and cook until softened, about 5 minutes.
~Stir in tomatoes and juice, 1 cup of water and all seasonings. Bring to a boil.
~Reduce heat, add roasted garlic paste and simmer for 30 minutes.
~Puree with hand blender until mostly smooth.

Nutritional information per serving (makes 12 cups):
71 calories, 2g protein, 3g fat, 11g carbohydrates

Read more...

Dad will be so proud!

>> Wednesday, October 22, 2008

I remember when my parents got a wok to try out some Chinese cooking. Specifically, I remember when Dad went wok-crazy! I swear we had stir-fry at least 4 nights a week for months. (Maybe I'm exaggerating a little here.) But, I do remember that whatever was left in our fridge went into the wok. Everything. As I have previously posted, I was a really picky eater so you can imagine the piles of stuff that was left on my plate. I probably only ate the meat. Anyway, memories of our stir-fry days came back last night when I decided to make some stir-fry myself. Since I'm a much better eater, I didn't have to be as picky about the ingredients. All I did was marinate some chicken in a little olive oil, ginger root, low-sodium soy sauce and garlic for an hour. Then, I threw the chicken, a little garlic, broccoli, carrots, mushrooms and green onions in my pan (sadly, I have no wok......hint, hint) and stir-fried away! The result was this yummy concoction:


So then, we needed some nice brown rice. I popped some in the microwave for 90 seconds and walked away. All of a sudden, there was a loud POP! Jason & I found ourselves on the ground ducking for cover from a drive-by! As we picked ourselves up off the floor, we discover that I just didn't read directions. There's a reason that you are supposed to vent the rice:


If you don't vent your rice, it explodes in your microwave!!! Luckily, I had a spare package of rice to save us and we were able to enjoy our yummy dinner together. Here's to you Dad for inspiring me to stir-fry on my own!

Read more...

  © Blogger template Webnolia by Ourblogtemplates.com 2009

Back to TOP